 The
Science Notebook
Gilbert Glass Blowing - Part
II
The
Science Notebook
Gilbert Glass Blowing - Part
II
NOTE: This book was published in as a manual
to accompany the Gilbert Glassblowing Set as part of the "Boy
Engineering" Series. the exact copyright date is
unknown, although based on information from "The Internet Archive" it is believed
that this publication is in the public domain. Many
today would not consider glassblowing to be a safe activity
for young people. Therefore, this book is
probably best appreciated for its historical value rather than
as a source for current information and good experiments.
If you try anything here, please understand
that you do so at your own risk. See our Terms
of
Use.
Pages 11 - 27
GLASS
BLOWING 11
Now look at the water level in each of the tubes. Is it above the
level of the water in the glass, and is it higher the smaller the
inside diameter of the tube, that is, is it higher in the No. 2 than
in No. 4, and in No. 4 than in No. 6?
Now take the thin capillary tube which has the largest inside
diameter, place one end in the glass of water, suck it full of water
and blow it out. Now with one end in the glass of water notice
quickly how the water rises inside the tube. Does it run uphill in a
most magical manner (Fig. 20), and does it remain there ?
Repeat this with your other capillary tubes. Does the water run
uphill in each, and does it rise higher the smaller the inside
diameter of the tube?
The "why" of this is explained in Gilbert's "Experimental Mechanics"
under "Capillarity."
WHAT IS GLASS?
Common glass is made from three substances with which you are all
more or less familiar; namely, sand, sodium carbonate (washing
soda), and lime.
If sand and soda or potash are mixed and heated to a high
temperature, they melt together and produce a glass which dissolves
in water. This is known as "water glass" and it is used in many
ways: to preserve eggs, to cement fire bricks, to make fireproof
cement, and so on. If, however, lime is added and the mixture is
heated to a high temperature, a glass is produced which is not
soluble in water. This is the glass you know.
The three most common kinds of glass are: Venetian glass, made from
sand, soda, and lime; Bohemian glass, from sand,
12
BOY ENGINEERING
GLASS
BLOWING 13
potash, and lime; and crystal or flint glass, from sand, potash, and
lead oxide.
14
BOY ENGINEERING
HOW ARE THINGS MADE OF GLASS?
The glass mixture is heated to a high temperature in fire clay pots
or tanks in large ovens. The surface is skimmed from time to time
and the heating is continued until all air bubbles have escaped from
the mixture, usually about three days.
The glass is now quite fluid and it is allowed to cool somewhat
until it is viscous; then the objects are made by blowing, pressing,
or rolling, as described below.
The finished articles are finally "annealed," that is, they are
placed while still hot in a second hot oven, which is then sealed
and allowed to cool slowly, for four or five days or for as many
weeks, according to the kind of glass.
If a glass object cools quickly, it cools more rapidly on the
surface than in the interior. This produces a condition of strain in
the glass and the object may drop to pieces when jarred or
scratched. This condition of strain is avoided by allowing the
objects to cool very slowly, that is, by annealing.
WINDOW GLASS
Window glass is blown in exactly the same way as you have blown
glass balloons; the process is illustrated in Fig. 1.
The glass mixture is heated for about three days in fire clay pots
and is allowed to cool until it is viscous. The glass blower then
attaches a lump of the viscous glass to the end of a straight iron
blowpipe about five feet long and blows a bulb. He then reheats the
glass and blows a larger pear-shaped bulb and in doing so rests the
glass on a pear-shaped mold of charred wood (see center of Fig. 1).
He again reheats the glass, holds the pear-shaped bulb over a pit,
and blows a long cylinder(see left of Fig. 1).
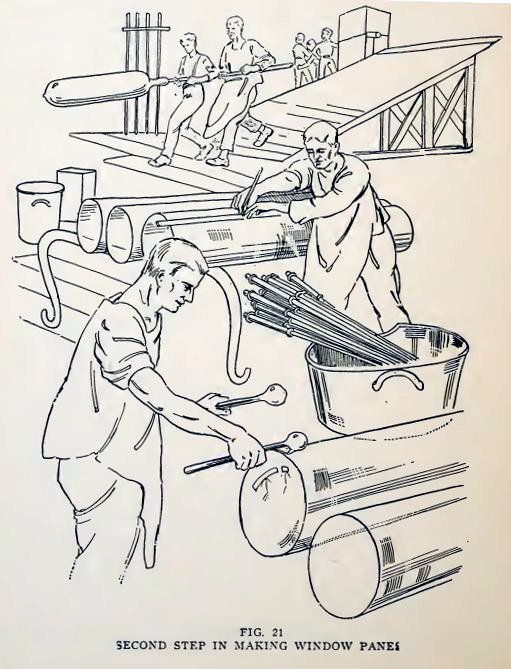
The ends of the cylinder are now cut off and the edges are smeared
with molten glass to prevent splitting (see right, Fig. 21). The
cylinder is next cut lengthwise with a diamond
GLASS
BLOWING 15
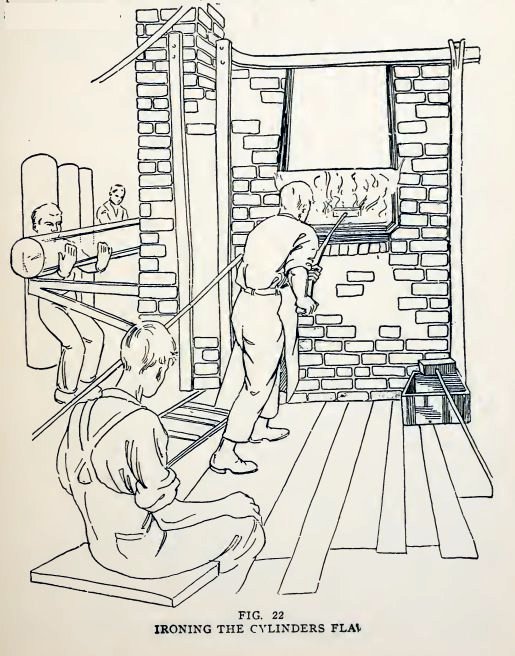
(center, Fig. 21), and is placed in a second hot oven, where it is
ironed out flat (Fig. 22).
The flat sheets are finally annealed in a third oven for a number of
days and are then cut into panes, sorted, and packed.
16
BOY ENGINEERING
GLASS TUBES
The glass tubes with which you do the experiments in this book are
made in the same way as window glass up to the stage of
blowing the cylinder; then the blower's helper attaches an iron
GLASS
BLOWING 17
rod to the opposite end of the cylinder (see right of Fig. 1), and
the blower and helper walk backward away from each other to pull the
cylinder into a tube. Of course, they use a small amount of glass to
make small tubes, and larger amounts for large tubes.
MOLDED GLASS
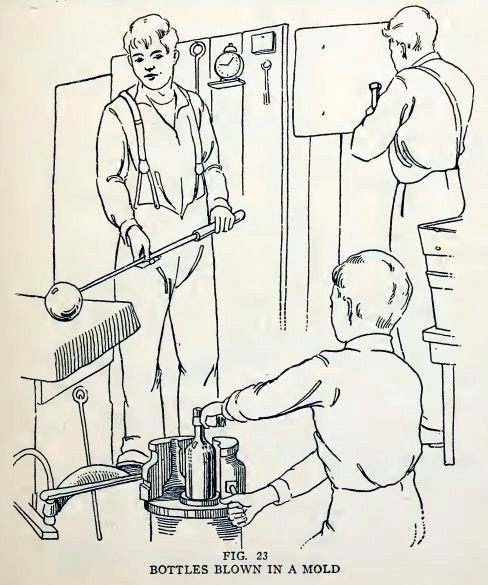
Many articles of glass are made by blowing the glass in molds.
Bottles are made in this way (Fig. 23), and large machines are now
in use which mold many bottles at one time in this way.
PRESSED GLASS
Many articles are made by pressing glass into molds, that is, the
molten glass is poured into molds and is pressed against the sides
of the mold by means of a plunger. Imitation cut glass is pressed in
this way.
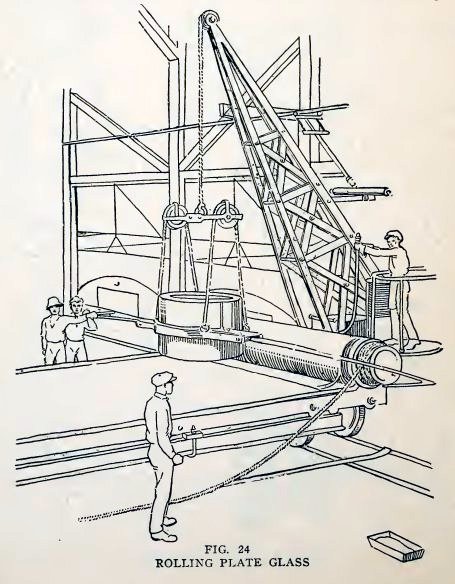
PLATE GLASS
The large sheets of plate glass used in store windows are not blown,
but rolled. The molten glass is poured from the fire
clay pots upon a cast-iron table and is rolled flat by means of a
large iron roller (Fig. 24). The glass is then in the shape of plate
glass, but is rough on both sides. It is annealed for a number of
days and then is ground smooth on both sides, first with coarse
emery, then with finer and finer emery, and is finally polished with
rouge. The result is the beautifully polished plate glass we see in
large windows.
OPTICAL GLASS
The United States and Great Britain made great strides in the
manufacture of optical glass during the war and there are now many
kinds on the market. They are used in making the lenses, prisms, and
mirrors for optical instruments.
Optical glass is made in much the same way as ordinary glass,
16
BOY ENGINEERING
but great care is taken : first, to see that the materials are pure;
second, to stir the glass constantly, as it cools from the molten to
the viscous state, to make it as uniform as possible; and third, to
cool it very slowly in the annealing process, to avoid strains.
QUARTZ GLASS
An entirely new glass has been placed on the market in quantity in
recent years. It is made by melting very pure quartz sand at a
temperature of 3000° F. and cooling it fairly rapidly. It has the
very valuable property of expanding and contracting very, very
slightly when heated and cooled. Thus there is practically no
internal strain set up when it is heated or cooled quickly and it
does not break. It can be heated red hot, for example, and then
plunged into cold water without breaking. It is probable that this
glass will be in universal use in a very few years.
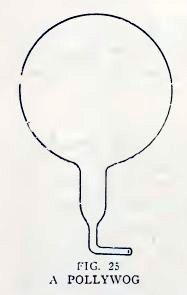
Experiment 12. To make an acrobatic
pollywog.
Smooth one end of a piece of No. 2 tube to put in your mouth, close
the other end in the blowpipe flame, take it out and blow a bulb
about 1/2 inch in diameter.
Allow the bulb to cool, then heat the tube about 1/4 inch from the
bulb and draw it out into a thin tube. Now bend the thin tube at
right angles near the bulb and break it off (Fig. 25).
Place the bulb in water. Does it float? If not, blow another with a
larger bulb.
GLASS
BLOWING 19
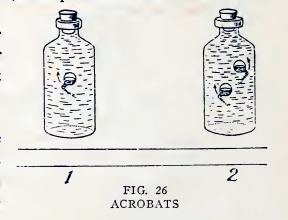
Experiment 13. Magic.
Place the pollywog in a bottle filled to overflowing with water,
insert the solid rubber stopper, and press it down hard. Does the
pollywog sink?
Now release the stopper quickly. Does the pollywog turn somersaults
in a most magical manner (1, Fig. 26), and also rise?
Make one or two more pollywogs, place them all in the bottle
together (2, Fig. 26), and entertain your friends with a pollywog
circus.
The pollywog sinks when you press down on the stopper because you
compress the air in it and force water in until it weighs more than
the water it displaces.
The pollywog rises when you release the stopper because the
compressed air drives the water out until the pollywog weighs less
than the water it displaces.
The pollywog turns a somersault because the water rushes out
sidewise in one direction and forces the nozzle in the other
direction.
20
BOY ENGINEERING
Air may escape from the pollywog when it is turning a somersault; if
so, water will take its place, and may make the pollywog too heavy
to float. You can restore its buoyancy by sucking out the water.
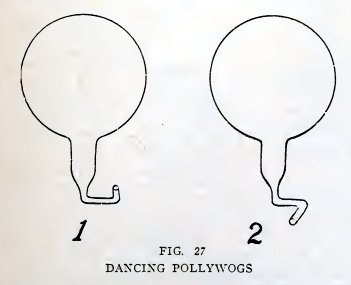
Experiment 14. A dancing pollywog.
Make a pollywog as in Experiment 12, but bend its tail twice as
shown in 1, Fig. 27; the nozzle is at one side and points sidewise.
Put it in the bottle full of water, then press down and release the
stopper. Does it sink and rise, and does it also whirl around most
beautifully as it rises?
Make another pollywog (2, Fig. 27), but bend its nozzle in the
opposite direction. Does it whirl in a direction opposite to that of
the first pollywog?
Put them in the bottle together and treat your friends to a pollywog
dance.
The pollywog whirls because the water rushes out of the nozzle in
one direction and forces the nozzle in the opposite direction.
GLASS
BLOWING 21
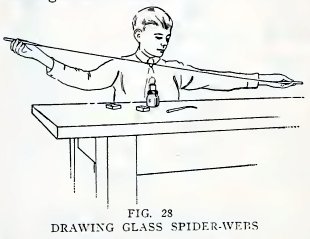
Experiment 15. To make glass
spider-web.
Heat the end of a piece of No. 2 tube in the blowpipe flame until it
is melted and very hot. Now touch the end of another piece of glass
to the melted glass, remove from the flame, and quickly pull the two
pieces apart as far as you can (Fig. 28). Do you find that you have
pulled part of the melted glass out into a very fine glass
spider-web?
Repeat, but ask a friend to touch the second piece of glass to the
first and run away as fast as he can.
Do you get a much finer spider-web?
Is the glass spider-web fairly strong and very flexible?
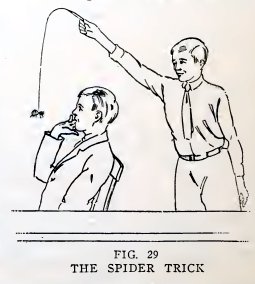
Experiment 16. The ancient spider
trick.
Attach an imitation spider — or the dead body of a real spider — to
the end of the glass spider-web and surprise your friends, as shown
in Fig. 29. The glass spider-web is much less visible than a thread
for this purpose.
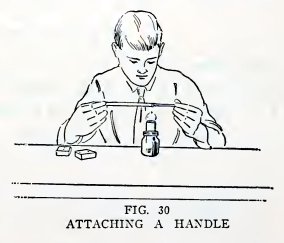
Experiment 17. To make working
handles.
You can save glass in many cases by attaching a short piece of glass
to the piece you intend to work with, as follows: Heat an end of
each piece in the lamp flame until red hot, press them together,
remove from the flame, and hold until solid. The short piece
then serves as a working handle (Fig. 30) for the large piece.
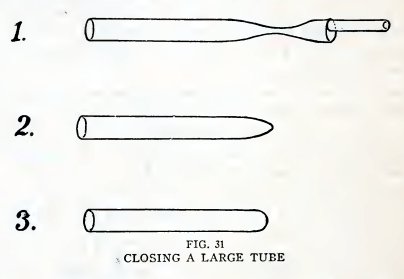
Experiment 18. To close a large
tube.
You closed small tubes in Experiment 5 by simply heating the end in
the blowpipe flame. This method does not serve for
22
BOY ENGINEERING
large tubes, however, because it leaves a very large lump of glass
which may crack on cooling or reheating.
Practice the following method of closing a large tube; first
with a piece of No. 4 tube, and then with a piece of No. 6: Attach a
working handle to the end to be closed, heat the tube 1/2 inch from
the end in the blowpipe flame, turn constantly, and when soft pull
apart until the tube has the shape 1, Fig. 31. Heat, turn, and pull
the end away to leave the tube as in 2. Heat the end and blow out
until it has the shape 3. The end is now closed and the glass has
about the same thickness as the remainder of the tube.
GLASS
BLOWING 23
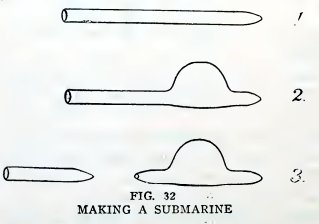
Experiment 19. To make a submarine.
Close one end of a piece of No. 2 tubing as described above, but
leave the end somewhat pointed (1, Fig. 32). Heat the tube on one
side at a distance 1/2 inch from the end and blow a bulb about 1/2
inch in diameter (2). Heat the tube 1/4 inch from the bulb, draw it
down into a fine tube, and break off the tube, leaving a small hole
in the end (3). Place the submarine in a glass of water, and if it
floats it is complete.
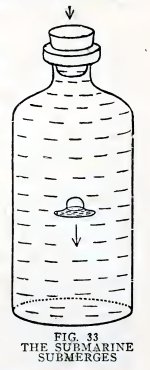
Experiment 20. Magic.
Fill a bottle to overflowing with water, insert the submarine open
end down, insert the solid rubber stopper and press down hard (Fig.
33). Does the submarine submerge?
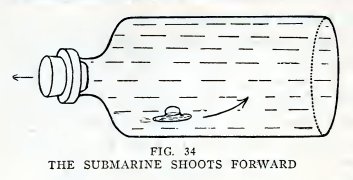
Release the stopper. Does the submarine rise and does it also move
forward?
Turn the bottle on its side and release the stopper quickly. Does
the submarine shoot forward at a great rate (Fig. 34)?
The submarine acts in this magical manner for the reasons given in
Experiment 9. When you press the stopper in, you compress the air in
the submarine and force water in until the submarine weighs more
than an equal volume of water and it sinks. When you release the
pressure ©n the stopper, the compressed air forces the water out
until the submarine becomes lighter than an equal volume of water
and it rises. The water rushing out through the opening exerts
pressure backward on the water in the bottle and the reaction drives
the submarine forward.
Experiment 21. Fun with the
submarine.
If your friends do not know about the little submarine, you can
mystify them as follows: Tell them that submarines are
24
BOY ENGINEERING
just like other fish; namely, they 1ay eggs, and the little eggs
hatch out after a certain number of days (of course, your friends
will know that you are only joking). Pretend that you found one of
these submarine eggs, hatched it out in lukewarm water, and that you
have trained the baby submarine to do some simple tricks. For
example, that you have trained it to submerge, rise, and attack,
when you issue the commands "submerge," "rise," and "attack."
Tell them to watch the submarine carefully and to notice that it
takes in water and submerges when you issue the command "submerge."
Stand the bottle on the table, issue the command "submerge" and,
while your friends are watching the submarine, press down on the
stopper unknown to them.
Tell them to watch the submarine carefully again and to notice that
it expels water and rises when you issue the command "rise." Issue
the command and unknown to them release the pressure on the stopper
slowly.
Repeat with the command "attack" and release the pressure quickly.
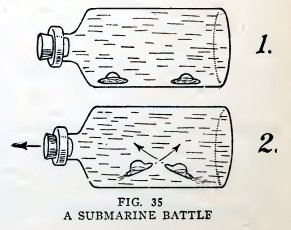
Experiment 22. A submarine battle.
Make a second submarine, place it in a large bot-
GLASS
BLOWING 23
tle with the first submarine, turn the bottle on its side, and make
the submarines manoeuver by moving the stopper in and out.
Finally arrange them so that they are on the bottom, facing each
other bow to bow, two or three inches apart (1, Fig. 35), and
release the stopper quickly. Do the submarines try to ram each other
(2, Fig. 35) in a most realistic manner?
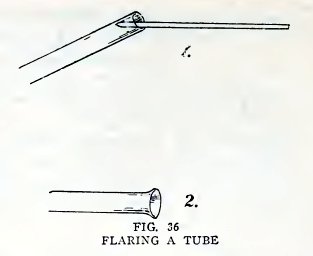
Experiment 23. To flare the end of
a tube.
Heat the end of a piece of No. 2 tube until it is red hot, take out
of the flame, hold the flaring wire inside the end, and press
outward gently while you revolve the tube (1 Fig. 36). Do you find
that the end is flared out (2, Fig. 36)?
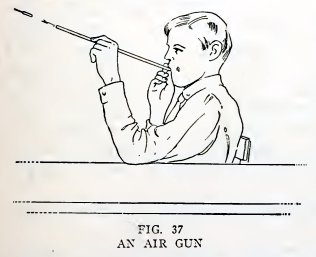
Experiment 24. To make an air gun.
Take a full-length piece of Xo. 4 tube and flare both ends slightly.
This is the air gun (Fig. 37).
Now to make an arrow, cut off the lighting end of a match and insert
a pin in the other end (Fig. 38).
BOY
ENGINEERING 26
Insert this arrow in the air gun and blow it out. Does it come out
with considerable speed?
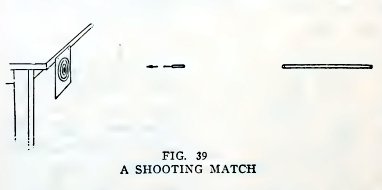
Experiment 25. A shooting match.
Draw a target on a piece of paper and hang it up, away from the wall
or at the edge of the table, where there will be space behind for
the arrows to pass through. Now shoot at the target with your air
gun (Fig. 39). Do you find that the arrow makes holes in the target
and sometimes goes right through?
The bull's-eye of a target is usually 1 inch in diameter, the next
circle outside is 2 inches in diameter, the next 4 inches, and the
outer circle 5 inches.
Get up a shooting match and keep track of the score made by each.
If the bull's-eye is cut anywhere by the arrow, the count is 5
points ; a cut anywhere inside or touching the 2-inch circle counts
4 points; anywhere inside or touching the next two circles counts 3
and 2 points respectively. The one who makes the highest score in
five shots is the winner, It is more sanitary if each shooter has
his own air gun and
arrows
GLASS
BLOWING 27
Experiment 26. Height and distance contest.
Go outside and see which of you can shoot his arrow to the greatest
height and to the greatest distance. Give each contestant five
shots.
You can make fair estimates of the heights if you shoot up beside a
building or tall tree.
Experiment 27. To make a pea
shooter.
Take a full-length piece of No. 6 tubing, smooth both ends and flare
them out slightly. This makes an excellent pea shooter. Try it with
peas. Do you find that they come out with great speed?
Experiment 28. A pea-shooting
match.
Make a target on a piece of paper, hang it up away from the wall or
at the edge of the table, and shoot at it (Fig. 40). Do you find
that the peas go right through the paper?
Arrange a match with your friends and keep track of the score as in
Experiment 25.
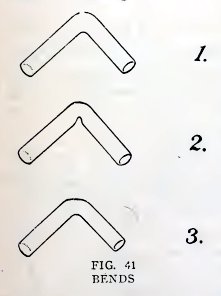
Experiment 29. To make a good bend.
A good bend has the same diameter in the bend as in the remainder of
the tube (1, Fig. 41). It is rather difficult to make
"The Science Notebook"
Copyright 2008-2018 - Norman Young