 The
Science Notebook
Gilbert Glass Blowing - Part V
The
Science Notebook
Gilbert Glass Blowing - Part V
NOTE: This book was published in as a manual
to accompany the Gilbert Glassblowing Set as part of the "Boy
Engineering" Series. the exact copyright date is
unknown, although based on information from "The Internet Archive" it is believed
that this publication is in the public domain. Many
today would not consider glassblowing to be a safe activity
for young people. Therefore, this book is
probably best appreciated for its historical value rather than
as a source for current information and good experiments.
If you try anything here, please understand
that you do so at your own risk. See our Terms
of
Use.
Pages 47 - End
GLASS
BLOWING 47
the book. Does the water run from both tumblers to the lower tumbler
until the levels are again the same?
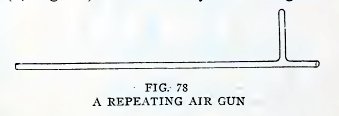
Experiment 58. To make a repeating
air gun.
Take a full length of No. 4 tubing, put a branch about 3 inches long
at a point about 2 inches from one end; leave the end of the branch
closed (Fig. 78). Now load the branch with shot or coarse dry sand,
and your repeating air gun is ready for use.
Tilt the branch slightly above the horizontal and blow
intermittently. Does your gun reload after each blow, until the
ammunition is used up?
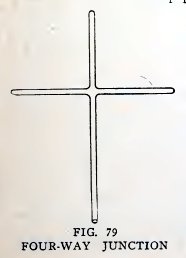
Experiment 59. To make a four-way
junction.
Make a tee as in Experiment 56, but do not cut off the closed
ends. Now attach a fourth arm, as in Fig. 79, and heat and
blow gently as before to work the glass into uniform condition. Cut
off the closed arms at equal lengths, smooth the ends, and your
four-way junction is made.
48
BOY ENGINEERING
Experiment 60. A four-arm siphon.
Make a four-arm siphon, repeat the experiments described in
Experiment 57, and make others of your own.
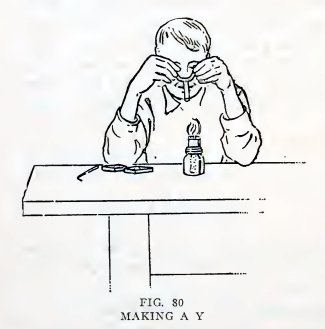
Experiment 61. To make a Y.
Make a tee as in Experiment 56, then make a bend about 1/2 inch from
the stem on each side (Fig. 80), and your Y is complete.
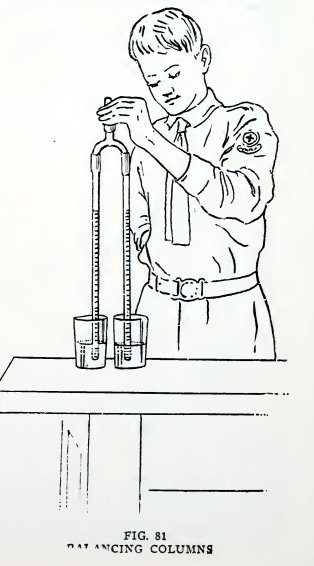
Experiment 62. Balancing columns.
Arrange the apparatus as in Fig. 81, put the arms together in a
glass of water, suck a little air out of the top coupling and close
it with a glass plug. Do you find that the water rises to the same
level in each?
Place the arms in separate tumblers filled with water to the same
level and repeat. Does the water rise to the same level?
Add an extra length to one arm and repeat. Are the levels different
but are they equal distances above the water in their respective
tumblers?
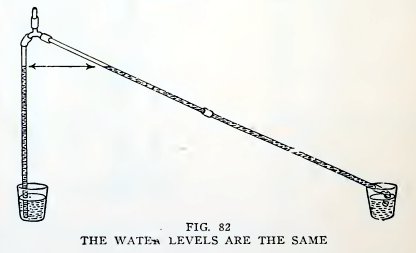
Place the tumblers on the table, make one tube slanting, and repeat
the experiment (Fig. 82). Are the levels again the same?
When you suck air out of the tee, you decrease the air pres-
GLASS
BLOWING 49
sure in the two tubes, and the atmospheric pressure on the water in
the tumblers lifts the water into the tubes.
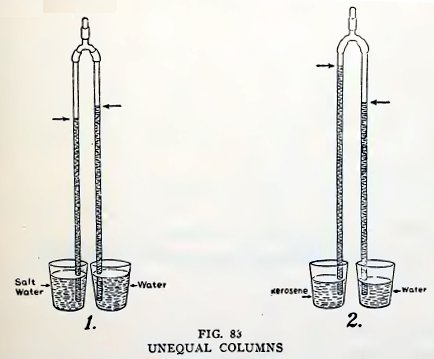
Experiment 63. Unequal columns.
Put a large handful of salt into a tumbler partly filled with water
and stir until the salt is dissolved. Now pour fresh water into
another tumbler until it is at the same height as the salt water.
Make the arms of equal length, put one arm in the salt water and the
other in the fresh water, then suck a little air out of the top
coupling and close it with a plug. Do you find that the column of
salt water is shorter than the column of fresh water (1, Fig. 83)?
It is shorter because salt water is heavier than fresh water.
If you have gasoline or kerosene convenient fill one tumbler half
full of either, and the other tumbler half full of water, then
repeat the experiment. Do you find that the column of gaso-
50
BOY ENGINEERING
line or kerosene is longer than the column of water (2, Fig. 83)? It
is longer because gasoline and kerosene are lighter than water.
Experiment 64. To fuse wire into
glass.
Find a piece of thin iron or copper wire about 4 inches long, heat
the end of a piece of No. 2 tubing until it is nearly closed, insert
the iron or copper wire into the small hole, and heat the glass
around the wire until it shrinks and grips the wire firmly (Fig.
84). The glass then serves as a handle for the wire.
It is difficult to make a secure joint between iron or copper wire
and glass because they both expand and contract more than glass when
heated and cooled. It is easy to make a secure joint between
platinum wire and glass because platinum and glass expand and
contract at practically the same rate when heated and cooled.
Platinum, however, is too expensive to be used for ordinary
experiments.
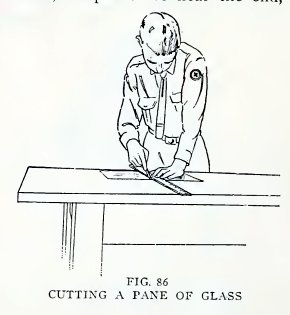
Experiment 65. To cut window glass.
The common glass cutter is a small very hard steel wheel
mounted on a handle (Fig. 85). Practice with one on a pane of glass:
place a ruler on the glass, draw the wheel along the ruler (Fig. 86)
with sufficient pressure to scratch the glass, place the under side
of the scratch exactly over the edge of the table, and press down on
both sides.
GLASS
BLOWING 51
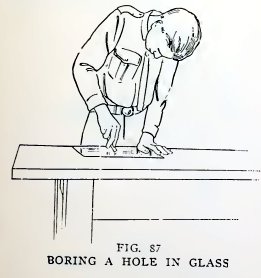
Experiment 66. To bore a hole in
glass.
Place a piece of window glass flat on the table, pour a little
kerosene on the spot to be bored, clasp the file near the end, press
the end down hard on the spot and turn it back and forth with a
gouging motion (Fig. 87). You twist the file just as you would twist
an awl to force it into hard wood.
You will soon penetrate the surface; use plenty of kerosene and
continue the boring until you are nearly through; then turn the
plate over and start a hole on the other side to meet the one you
have made.
Do not rush things; it will take you ten or fifteen minutes to bore
through ordinary window glass.
Bore a hole in a bottle in the same way, except that the boring is
all from the outside.
If the end of the file becomes dull, break off a small piece, with a
pair of pliers, to expose a fresh surface.
52
BOY ENGINEERING
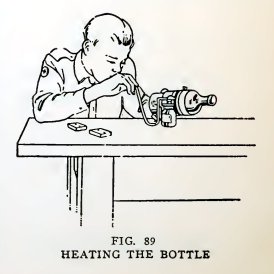
Experiment 67. To cut a bottle in
two.
Wind a strip of blotting paper or wrapping paper 2 inches wide
around the bottle at one side of the line along which you wish to
cut. Make three or more thicknesses and then tie the paper with cord
within 1/2 inch of the edge to be cut. Wrap another similar piece on
the opposite side of the place to be cut and 3/16 inch from the
first piece (Fig. 88).
Now stand the bottle in a pail of water until the paper is
thoroughly wet (about five minutes), take it out, rotate it in
a horizontal position and direct the blowpipe flame against the
glass between the papers (Fig. 89).
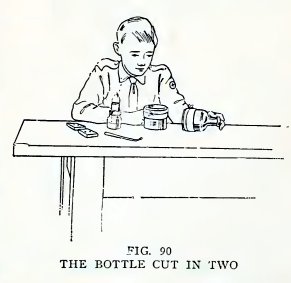
Continue this for four or five minutes, then if the bottle has not
dropped apart, plunge it vertically into the pail of water.
The bottle will break into two parts along the line between the two
papers (Fig. 90). If it does not do so, re-
GLASS
BLOWING 53
peat the operation until it does. Smooth the rough edges outside and
inside with the file. You cannot do this with the flame because the
glass is too brittle.
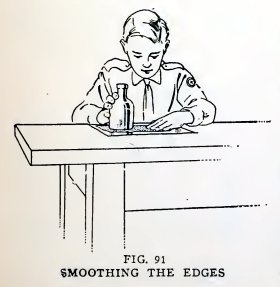
Experiment
68. To grind glass.
Rough edges of glass can be ground smooth by means of emery paper.
For example, to smooth the edges of the glass bottle you have just
cut in two, use the file for the rough work, then lay a piece of
emery paper on a plate of glass, emery side up, pour a little
kerosene on it and rub the rough surface on the emery with a rotary
motion (Fig. 91).
Finish with fine emery paper, and smooth the edges inside and out
with the fine paper.
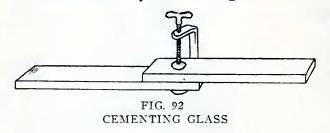
Experiment 89. To Cement glass.
There are two important points to remember in cementing glass:
first, to get the glass clean, and second, to press the surfaces
together after applying the cement, to squeeze out as much of the
cement as possible,
54
BOY ENGINEERING
and to keep them pressed together until the cement is hard. To clean
the glass wash it thoroughly with soap and water, rinse, and dry
with a clean cloth.
There are many excellent glass cements on the market. Some of these
are solid and are used only on hot glass: others are liquid and are
used on cold or hot glass.
Cement two strips of glass together (Fig. 92) with sealing wax or
solid shellac or some other solid cement as follows: Clean the glass
thoroughly, place in the oven or on the stove, heat gradually until
the glass just melts the cement, rub the cement over both surfaces,
bring them together when the cement is fluid, press them together to
squeeze out as much cement as possible, and keep them pressed
together until the cement is hard.
Cement a strip of wood to a strip of glass in the same way.
Cement a strip of wood to a strip of glass with liquid glue, both
wood and glass being cold. Keep them pressed together until the glue
is dry, perhaps a day or two.
MAGICAL EXPERIMENTS
Boys, you can perform many magic experiments with apparatus made out
of the glass tubes, rubber stoppers, and rubber unions supplied with
"Experimental Glass Blowing." We outline a number in the following
pages. You can invent many more for yourselves.
MAGIC WITH FLAMES
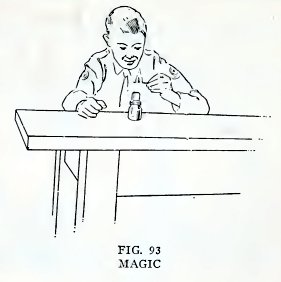
Experiment 70. Magic lighting.
Light your alcohol lamp, blow it out, and bring a lighted match
GLASS
BLOWING 55
down toward the wick from above (Fig. 93). Does the lamp light in a
most magical manner before the match touches the wick?
Repeat this with a kerosene lamp and with a candle. Do they light in
the same magical manner?
The "why" of it
When the lamp is lighted, the alcohol or kerosene turns to a gas,
and it is the gas which burns; when the candle is lighted, the wax
turns to an oil, the oil turns to a gas, and it is the gas which
burns.
The gas rises from the wick for a short time after the flame is
blown out, and it is this gas which lights when you bring the match
down toward the wick.
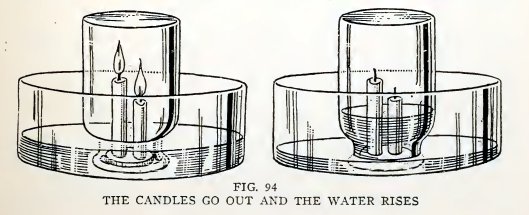
Experiment 71. Air used by flames.
Drop melted candle wax on a tin ca a cover and attach the bottoms of
two candles to the cover (Fig. 94); use one candle about
56
BOY ENGINEERING
4 inches long and another about 3 inches, stand them upright in a
pan of water, light them, and invert a wide-mouthed bottle over
them. Does some air escape at first due to expansion, do both
candles go out, the taller one first, and does the water rise until
the bottle is about one-fifth full?
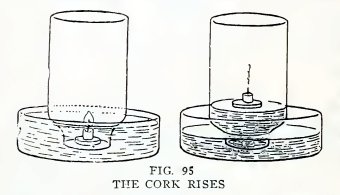
Cut a piece of candle 1/2 inch long, float it on a flat cork or can
cover in the pan of water, light it, and invert a fresh empty bottle
over it(Fig.95). Is the result similar?
The "why" of it
The water rises in the bottle because 1/5 of the air is used up by
the burning candle. Air is 1/5 oxygen and 4/5 nitrogen. The oxygen
unites with the burning gas of the candle and produces water vapor
(H20) and carbon dioxide (C02); the nitrogen
takes no part in the burning. The water vapor (H20)
condenses to water on cooling and takes up very little space. The
carbon dioxide remains a gas and occupies space, but this is offset
by the volume of the air which escaped at first. The result is that
the volume of gas at the end is about 1/5 less, and the atmospheric
pressure on the water in the pan lifts water into the bottle.
The candle goes out because it must have oxygen to burn and the
oxygen is used up.
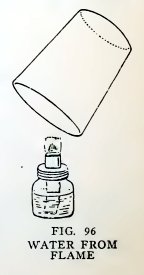
Experiment 72. Water produced by
fire.
It is certainly magic to produce water from fire, but you can
do it easily as follows:
GLASS
BLOWING 57
Hold a clean, dry, cold tumbler over your alcohol lamp flame (Fig.
96). Does water deposit in the form of mist on the inside nf the
tumbler?
Repeat with fresh tumblers with the flame of a kerosene lamp and of
a candle. Are the results similar?
Direct the blowpipe flame into the end of a piece of No. 2 or 4
tubing. Does water deposit in drops inside the tube about 1 inch
above the end?
The "why" of it
One of the chief constituents of alcohol, kerosene, and candle wax
is hydrogen (H), and when this burns in the oxygen (O) of the air,
it produces water (H20). It is this water which condenses
on the cold glass.
MAGIC WITH AIR
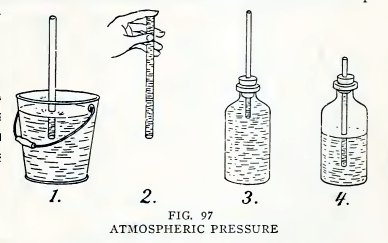
Experiment 73. Atmospheric
pressure.
Arrange a No. 6 tube as in 1, Fig. 97, and suck air out at the top.
Does the water run uphill into your mouth?
Hold your finger over the top and lift the tube out of the pail (2).
Does the water remain in the tube ? Fill a bottle with water to
overflowing, insert a No. 2 tube into your one-hole stopper, insert
the stopper into the mouth of the bottle (3) without admitting air
below the stopper, and try to suck water out of the bottle. Do you
find that you cannot do so ?
58
BOY ENGINEERING
Repeat (3) with the bottle half full of air (4). Do you find that
you can now suck part oi the water out of the bottle, and all of it
if you admit air?
The "why" of it
The atmosphere which surrounds the earth exerts a pressure of 15
pounds per square inch on everything at the earth's surface. It
exerts this pressure equally downward, sidewise, and upward.
It is this atmospheric pressure on the water in the pail (1) which
lifts the water into the tube when you decrease the pressure on the
water in the tube by sucking out air and then water.
It is this pressure upward that supports the water in 2.
The water does not rise in 3 because the atmosphere cannot exert
pressure downward on the water in the bottle.
The rise of the water in 4 is due to another fact, namely, that any
gas expands when the pressure on it is decreased. When you suck air
out of the tube you decrease the pressure on the water in the tube
and thereby on the air in the bottle; the air then expands and lifts
the water into your mouth.
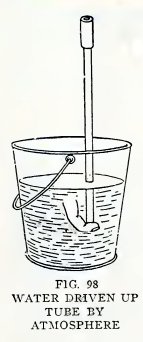
Experiment 74. Great pressure of
air.
With the apparatus Fig. 98
GLASS
BLOWING 59
hold your finger over the lower end of the tube, suck as much air as
you can out of the tube, pinch the coupling, and remove your finger
under water. Does the atmosphere drive water up the tube very
rapidly and with great force?
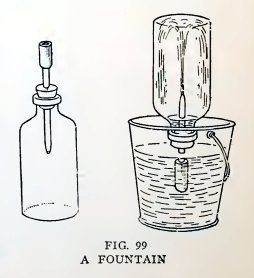
Experiment 75. A fountain.
With the apparatus Fig. 99 suck as much air as you can out of the
bottle, pinch the coupling, and open it under water. Does the
atmosphere lift the water into the bottle and produce a beautiful
fountain ?
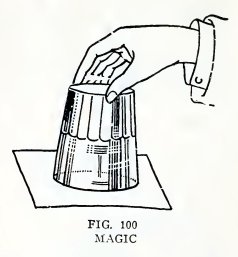
Experiment 76. Magic tumbler.
Fill a tumbler with water, cover it with a sheet of paper, hold the
paper on with your hand, invert the tumbler,and remove your hand
(Fig. 100). Does the atmospheric pressure upward support the paper
and water?
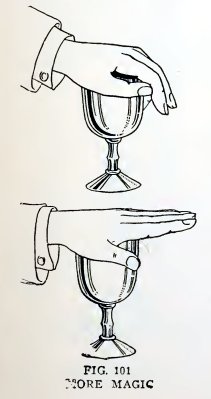
Experiment 77. Magic lift.
Fill a tumbler with water, press your palm down on the top with your
fingers pointing downward (Fig. 101), straighten your fingers
without admitting air to the tumbler, and then lift your hand. Do
you lift the tumbler of water also?
There is a partial vacuum between your hand and the water, and the
60
BOY ENGINEERING
atmospheric pressure upward and downward holds your hand and the
tumbler together.
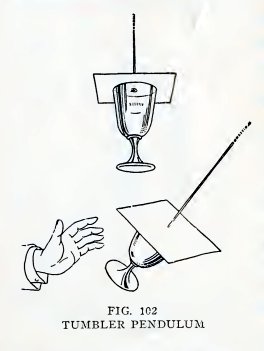
Experiment 78. A magic pendulum.
Pass a string through a small hole in a piece of cardboard, knot the
end of the string, and drop melted candle wax over the hole to make
it air tight.
Fill a tumbler with water, press the cardboard down on the tumbler
with the palm of your hand, and lift the string. Do you also lift
the tumbler (Fig. 102)?
Swing the tumbler gently as a pendulum.
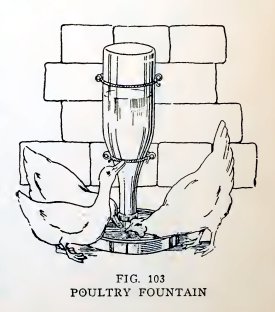
Experiment 79. A poultry fountain
To make the poultry fountain (Fig. 103), fill a bottle with water,
hold your thumb over the mouth, invert the bottle over the pan of
water, and remove your thumb under water. Does the atmospheric
pressure on the water in the pan hold the water in the bottle?
Lift the bottle until the mouth is a little above the water \v the
pan. Does air
GLASS
BLOWING 61
enter and water run out until the mouth is again covered with water?
This is what happens when the poultry, by drinking, lower the water
below the mouth of the bottle.
In a poultry fountain the bottle is supported, as shown, with its
mouth under water but above the bottom.
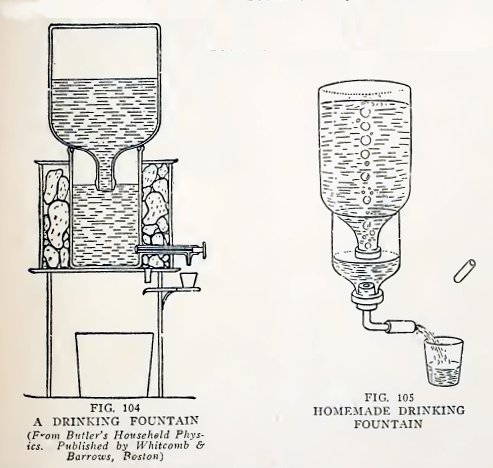
Experiment 80, A drinking fountain.
The drinking fountain (Fig. 104) is similar in principle to the
poultry fountain of the last experiment. The water is held in the
large inverted bottle by the atmospheric pressure on the water in
the lower vessel. Air enters the bottle and water escapes from it
when the level of the water in the lower vessel falls below
62
BOY ENGINEERING
the mouth of the bottle. The water is cooled by the ice surrounding
the lower vessel.
Make a drinking fountain of this kind as in Fig. 105, ask a friend
to hold it, remove the glass plug from the coupling, and draw a
glass of water. Do you observe that air bubbles enter the inverted
bottle and water flows from it only when the water level in the half
bottle falls below the mouth of the inverted bottle?
Allow the water to flow continuously. Is the water level practically
constant in the half bottle until the upper bottle is empty?
END
"The Science Notebook"
Copyright 2008-2018 - Norman Young