 The
Science Notebook
The
Science NotebookSound
The
Science NotebookHome Terms of Use Safety Contact Us Experiment Pages Downloads Supplies Useful Links!
Have you ever heard that old question, “If a tree
falls in the woods and there is no one to hear it, does it
make a sound.?”? The answer depends on your point of
view. If sound is what our ears send to our brain
after the ears detects the sound, and if no one is there to
hear it, there is no sound. On the other hand, if
sound is something created by the fall of the tree that
doesn’t depend on whether anyone has to be around to hear
it, then there is sound, whether anyone hears it or
not. These experiments may not answer the question,
but they will help you learn quite a bit about the nature of
sound. After doing them, you may still not know the answer,
but at least you will be able to debate the question
intelligently!
Materials
Needed: Plastic or thin wooden ruler; tabletop.
Procedure:
Place the ruler on the tabletop so that about 15 cm (6 in)
extends off the table. Place one hand on top of the
portion of the ruler on the table to hold the ruler firmly in
place. With your other hand, push down on the other end
of the ruler and let it go. Listen carefully to the
sound it makes. Also, watch the ruler carefully.
Slide the ruler so that about 2 cm (1 in) more at a time on is
the table and repeat. What do you hear?
What Happened: When
you released the ruler, it began to vibrate, or to move back
and forth rapidly. It was the vibration of the ruler that
produced the sound. As the ruler vibrated, it
moved the air around it and caused the air to vibrate as
well. This vibrating air spread out in waves much like a
series of ripples spread out from a pebble thrown in the
water. When these vibrations reached your ear, they were
interpreted by your brain as sound. These vibrations move out
as waves, and in fact, are called sound waves. All sound waves
are produced by vibrations.
You should have also noticed that the pitch of the ruler was
higher as the length of the vibrating portion of the ruler
(the part hanging off the table) was shortened.
The pitch of a sound is controlled by the speed of the
vibrations. The faster the vibrations, the higher the
pitch of the sound. The slower the vibrations, the lower
the pitch of the sound. In this experiment, the rate of
vibration, and thus the pitch, was controlled by the length of
the vibrating ruler. This rate of vibration is called
frequency and in measured in vibrations or cycles per
second. More about that later.
Materials
Needed: Piece of string about 125 cm (50 in) long;
doorknob.
Procedure:
Tie one end of the string to a doorknob. Measure 25 cm
(10 in) from the doorknob, and pull the string taut.
Pluck the string. As you do, listen to the sound, and
observe the vibration. Repeat at 50 cm (20 in), 75 cm
(30 in) and 100 cm (40 in).
What Happened: As the
string was lengthened, the pitch decreased. When the
length of a taut string is increased, the frequency (rate of
vibration) is decreased, and as a result, the pitch decreases.
Going Further: You
may observe how length of a string and pitch are related by
examining a guitar. You can change the length of the
vibrating part of a string on the guitar by pressing the
string down on a fret. (The frets are the raised parts
on the neck of the guitar.) As you shorten a string on
the guitar by pressing it against one of the frets, the pitch
of the sound is higher. As you lengthen the string, the
pitch is lower.
You may also notice that some strings on the guitar are
thicker than others. The thickness of the string will
also affect the pitch as we will see.
Materials
Needed: Wooden board about 30 cm long; 4 nails;
hammer; thick rubber band; thin rubber band of the same
length.
Procedure:
Nail two nails 25 cm apart as shown. Nail two other nails
parallel to the first two, also 25 cm apart.
Stretch one of the rubber bands between two of the nails 25 cm
apart as shown. Do the same thing with the other rubber band.
Pluck each rubber band and notice the difference.
Save this board for the next experiment.
What Happened: The
thicker rubber band has a lower pitch. As the thickness
of a vibrating material increases, the rate of vibration
decreases, and the pitch also decreases. Likewise, as
the thickness of the vibrating material decreases, the pitch
increases.
Going Further: Just as
you saw how the length of a string affected pitch in a guitar,
you can also observe how the thickness of a string affects the
pitch. When you pluck the strings without pressing any
of the frets, you will notice that the pitch of the thicker
strings are lower.
If the guitar is properly tuned, press the fifth fret of the
top string. Now pluck the top string and the second
string. If the guitar is tuned, the pitch should be the
same. Because of this, you should see that the pitch may be
controlled by either the length of a string or it’s
thickness.
There is one more factor
that will affect pitch.
CAUTION! Always use sharp
objects such as knives or scissors with adult supervision
only! Hold any sharp point away from your body,
particularly your eyes.
Materials
Needed: Board with nails from the last experiment;
two identical rubber bands; scissors.
Procedure: Cut
each of the rubber bands to make a thin rubber strip.
Tie one end of one of the rubber bands to one of the nails and
stretch it taut, but just barely. Keeping it taut, tie
the rubber band to the other nail.
Repeat with the other rubber band strip, but this time,
stretch the rubber band as taut as you can without snapping
it.
Pluck each of the rubber bands and note the difference in
pitch.
What Happened: The
rubber band that was stretched tighter vibrated faster when
plucked. The faster vibration created a higher
pitch.
As any solid is drawn more taut, its rate of vibration will
increase, and the pitch will also increase.
Going Further: This
last factor that affects pitch may also be seen in a
guitar. If someone will let you use their guitar, pluck
one of the strings as you loosen and tighten that string using
the tuning nut at the end of the neck. As you tighten
the string on the guitar, the rate of vibration of that string
increases, and the pitch increases as well. Be careful
not to tighten it so much that the string breaks!
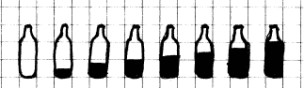
Materials
Needed: Eight identical glass bottles; measuring cup;
water; spoon.
Procedure: Leave the
first bottle empty. Add 30 ml (1 ounce) of water to the
second bottle. Add water to the remaining bottles by
adding 30 ml (1 ounce) more to each bottle than you did to the
previous one.
Using your spoon, tap each bottle gently and notice the sound
it produces.
Save this setup for the next experiment.
What Happened: The
pitch of each bottle was different. Up to this point we
have used only strings to make sounds, but here, the sounds
were produced by the vibrating glass.
When each bottle was struck by
the spoon, it began to vibrate. The rate at which the
glass vibrated was determined by the amount of water in each
bottle. This is the same principle that a xylophone uses to
make music. On a xylophone, the sounds are produced when
bars of metal are struck. Each bar of metal is a
slightly different length, so it vibrates at a different rate
from all the others. This causes each bar to produce a
different pitch.
Going Further: If you
are musically inclined, you can “tune” your water bottle
xylophone by adding or taking water away from each
bottle. See whether you can tune your bottles to play a
musical scale.
Materials
Needed: Setup from the last experiment.
Procedure: Blow across
the top of each bottle from the last experiment and notice the
pitch produced.
What Happened: As you
probably expected, a different pitch was produced by each
bottle. This time, however, it was mainly the column of air
inside the bottle that was being vibrated, rather than the
glass. Gases such as air may be vibrated directly
to produce sound. The rate of vibration, and therefore
the pitch, is caused by the size of the column of air
produced.
Going Further: If you
tried to tune your bottles (See “Going Further” In the last
experiment), do the tuned bottles produce a musical scale when
you blow across them? Are the notes the same?
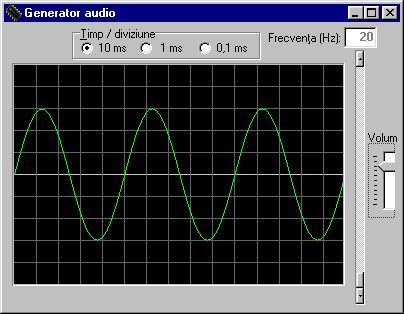
So far, we have seen how the rate of vibration is
related to pitch. As the rate of vibration increases,
the pitch increases. But what does the rate of
vibration mean? This rate of vibration is called
“frequency” and is measured in Hertz or cycles per second as
we will see in this experiment.
Materials Needed:
Piano, electronic keyboard, or other musical instrument;
someone who knows how to play it.
Procedure: Have the
person to play a musical scale starting with “middle C”.
Listen carefully to the pitch as it changes. Next, have
the person to play the next octave above the scale.
What Happened: When
middle C is played, the instrument causes air to vibrate at
264 times per second. Each complete vibration is also
called a “cycle”, so the rate of vibration is 264 cycles per
second. There is a unit called the Hertz which is used
to measure frequency in cycles per second. One Hertz is
one cycle per second, so the frequency of middle C is 264
Hertz.
The frequencies for the notes in the scale beginning with
middle C are:
| Note C D E F G A B C |
Frequency (Hertz) 264 294 330 352 376 440 495 528 |
An octave consists of the 8
notes on the musical scale. When the next note is played above
that octave, the musical scale starts over with the same
notes, but at a higher pitch. The next note played after the
scale, was also “C”, but it was one octave higher. The
frequency was double that of middle C, or 528 Hertz. The
frequency of each note in the next octave is always double
that of the same note in the octave below it.
So far, in all of our
experiments studying sound, the sound we have heard reached
our ears by causing air to vibrate. The next two
experiments will help us to understand how these invisible
waves move through air.
Materials
Needed: Sink; water; eye dropper or soda straw.
Procedure: Fill the
sink with two or three inches of water. Allow the water
to become still.
Draw a little water into the eyedropper or straw. Allow
a single drop to fall on the surface of the still water in the
middle. Observe how the waves spread out from the drop.
What To Look For: In
this experiment, be sure to notice the height of the waves as
they spread out.
What Happened: The
drop of water created waves that moved out in a series of
circles. As the waves moved further away from the center, the
height of each wave got smaller. This is because the energy in
that wave is spread out over a larger area as the circle
grows.
Sound waves move in somewhat the same way through the air,
although they are Invisible to us. Since a sound wave in
air spreads out in all directions, the energy reaching your
ear decreases the farther you move from the source of the
sound, and the sound is not as loud.
Materials
Needed: Slinky® or similar spring toy; a friend.
(HINT: You can sometimes find small spring toys at a "dollar"
store.
Procedure:
Take one end of the Slinky ® and have your friend to take the
other end. Stretch it by moving away from one another
until it no longer sags to the floor in the middle.
Now squeeze several coils together near your end and quickly
release them. Observe what happens.
What Happened: You saw
a wave in the Slinky ® move away from you, toward your friend,
and it may have also returned back to you. In fact, this
may have happened several times. However, if you looked
carefully, you also saw that the a portion of the spring was
squeezed together as the wave moved through it, followed by a
portion that was spread out.
The Slinky ® behaved something like molecules of air
when sound travels through it. When air is vibrated, it
is first “compressed” or squeezed together. The air is
then “rarified” or spread apart. This is repeated over
and over as the source of the sound vibrates back and forth
and causes the air to compress and rarify. Of course,
the sound wave continues to move away from the source unless
something causes it to be reflected back. We’ll see an example
of that in the next experiment.
Materials
Needed: Yourself; a large building.
Procedure: Stand at
least the length of several football fields from the
building. Face the building and cup your hands around
your mouth. Give a short yell and listen. What do
you hear?
What Happened: You
should have heard an echo within about a second after you
yelled. When you cupped your hands, that helped to channel the
sound toward the building. The sound waves moved away
from you toward the building. However, when they reached
the building, some of the sound waves were reflected off the
building and bounced back. The returning sound waves
produced the echo that you heard.
Going Further: If you
live near a large cliff or mountain, or even a line of trees
at the edge of a forest, see how far away you can stand from
them and produce an echo that you can hear.
Materials
Needed:
Two small pieces of wood, such as two small blocks of 2
x 4 lumber; a large open area such as a football field; a
friend.
Procedure: Have your
friend take the two wood pieces and move 100 or more meters
(yards) away from you. Explain that you will hold one of
your arms up, and when you drop it, you want your friend to
clap the wooden blocks together. (Or, if you can get a pair of
"walkie talkies", you can communicate back and forth without
hand signals!)
Raise your arm and then lower it. Notice what you see
and hear when the boards are clapped together.
If you have enough space, keep moving apart until you can no
longer hear the sound.
What Happened: You
should have seen the boards clapped together a split second
before you heard the sound. This is because the light
that allows you to see the boards clap together is moving
extremely fast - 186,000 miles per second! However, the
sound moves much more slowly - about 1,000 feet per second
through air. The light reaches you almost instantly, but
the sound is much slower.
Going Further: You can
use the speed of sound to determine approximately how far away
a thunderstorm is. The thunder is produced by the
lightning. When the lightning is close by, you hear the
thunder at the same time as you see the lightning.
However, the farther away you are from the lightning, the
longer the thunder seems to follow the lightning.
CAUTION: To avoid being hit by
lightning, do not stand outside during a thunderstorm!
Since one mile is equal to 5,280 feet, and since sound travels
through air at about 1,000 feet per second, you can count the
time between the time you see the lightning and the time you
hear the thunder. For every second of difference, the
lightning is about 1/5 mile away.
Sounds usually reach our
ears by vibrating air, but they can be carried in other ways
as well. The following experiments will show you other
ways sound may be transmitted.
Materials
Needed: Metal fork; 1 meter piece of string.
Procedure:
Tie the fork to the middle of the string. Press the ends
of the string up to the opening of your ear and allow the fork
to hang freely. Gently swing the fork against a tabletop
or wall and listen. Move the string away from your ears
and listen. Now what do you hear?
What Happened: When
the string was held against your ears, the fork sounded like a
chime. As the fork vibrated, the vibrations moved up the
string to your ear. Although some of the sound was
transmitted your ear by vibrating air, most of what you heard
was as a result of the vibrations of the string.
When you moved the string away from your ears, the sound
reaching your ears was as a result of the vibration of air
only and was much fainter.
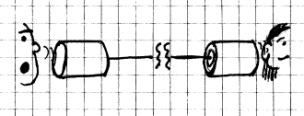
Materials
Needed: 2 tin cans; 10 meter (40 ft) length of
string; nail; hammer; 2 buttons; a friend.
Procedure: Punch a
hole in the bottom of each tin can using the hammer and
nail. Work the nail around each hole to flatten the
sharp edges as much as possible. If you have a small piece of
board, you can stick it down inside the can and use the hammer
to flatten the sharp metal even more. By flattening the sharp
edges, the string will be less likely to be cut by one of the
edges. (So will you!)
Run one end of the string through the bottom of the can and
tie it through two of the holes of a button. Do the same
thing with the other can.
Take one can and give the other to a friend. Stretch the
string taut, but not so tight that the string will
break. Have your friend to speak into the can while you
listen. Then talk while your friend listens. What
happens?
What Happened: The
sound was carried between the cans by the vibrating string.
When you spoke into the can, the sound waves from the air
vibrated the can, which caused the taut string to
vibrate. These vibrations traveled the length of the
string and caused the can at the other end to vibrate. In
turn, this vibrated the air, which produced the sound waves
heard by your friend.
Your voices could be heard by each other even if you spoke in
a whisper because the energy of the sound wave was
concentrated in the string rather than being spread out
through the air.
Going Further: Try
different using kinds of string to see which works best.
Also, try using nylon fishing line instead of string.
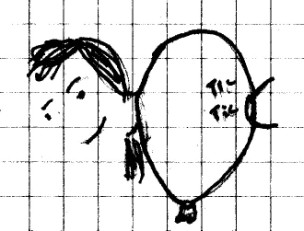
Materials
Needed: You; a good quality digital or tape recorder;
a friend.
Procedure: Record
your friend’s voice and play it back. Ask your friend
whether the tape sounds like his or her voice.
Now record your own voice and play it back. Does it
sound like you?
What Happened: If you
used a good quality tape recorder, the voice of your friend on
the tape should have sounded very similar to that of your
friend in person. However, when you heard your voice from the
tape recorder, you probably didn’t think it sounded like you
at all. Here’s why...
When you speak, the sound of your voice is produced by
membranes in your larynx or “voice box.” These membranes
are called vocal cords and they vibrate as air is forced
across them. The sounds are varied by varying the
thickness of these membranes. Sound familiar?
When others hear you speak, they hear sounds that are created
only by the vocal cords. However, as you speak, these vocal
cords cause the bones in your head to vibrate as well, and the
sound of your voice as heard by you is a combination of the
vocal cords vibrating the air and vibrating the bones in your
head. When you heard your voice on a tape recorder, the
sound that was recorded is very similar to what others hear
when you speak, because it records the part of the sound of
your voice produced only by your vocal cords vibrating the
air. When this was played back, you heard your voice as
others do - without the vibrating bones - and it probably
sounded a little unfamiliar. For the same reason, your
friend probably didn’t recognize his or her voice on tape
either.
Materials
Needed: Balloon; watch or small clock that ticks.
Procedure: Inflate
the balloon and tie it off. Put it aside for a minute.
Hold the watch or clock the same distance from your ear as the
width of the balloon. Note how loud or soft it sounds.
Now, hold the balloon firmly against your ear and hold the
watch or clock against the other side. How loud does it
sound now?
What Happened: The
air in the balloon is slightly compressed, and it carries
sound much better than uncompressed air. Also, some of
the vibrations were transmitted by the tight surface of the
balloon. Because of these two factors, the balloon was able to
concentrate the energy of the sound waves, and the ticking
sounded louder when heard through the balloon.
Going Further: Try
this with an empty plastic 2 liter soft drink bottle; a
plastic milk jug, an inflated plastic bag; and a glass
jar. Which works best? Do you have any idea why?
CAUTION: Never
yell into a tube while someone else has their ear on the
other end. This can damage their hearing and is very
painful!
Materials Needed: A
friend; a long cardboard tube such as a mailing tube or a
wrapping paper tube. (If you don’t have one, try rolling
a tube from stiff cardboard such as poster board.)
Procedure: Have your
friend to stand beside you while you whisper into one end of
the tube. Ask whether your friend can hear you.
Next, have your friend to whisper in the other end while you
stand along side and listen. Can you hear your friend?
Now whisper into your end while your friend has his or her ear
up to the other end of the tube. Again have your friend
to whisper while you listen through the tube. Can you
hear each other now?
What Happened: You
should have been able to hear the sound of your friend’s
whisper much more clearly through the tube. The tube channeled
most of the sound energy and kept it from spreading out in all
directions.
Many ships used to have a network of “speaking tubes” that
were used to communicate between different parts of the ship.
Going Further: Try
this same experiment using a garden hose that has been
stretched out on the ground instead of a cardboard tube.
(Make sure there is no water in the hose or you could get a
wet ear!) Also, make a couple of funnels from the tops
of 2 liter plastic bottles, and tape one to either end of the
hose. Does this improve your performance? If you can
talk back and forth with one garden hose, try connecting
two.
| Note C D E F G A B C |
Frequency (Hertz) 264 294 330 352 376 440 495 528 |